Prelim Notes:
South facing is ideal. I would wait until spring, and then use a dozer with a 7 foot wide 6 way blade to grade laterally across the slope at blade width separation. Create benches with a slight negative slope at the blade width apart, so that each bench is a balanced cut and fill, with a 2% grade back towards the hill and less than a 2% grade along the bench to ensure sheet flow. That means that water will tend to run back and pool against the hill, being absorbed through the cuts. Put a trench down the center of each bench and lay a perforated drain pipe and an irrigation pipe into each trench. before filling it with a little 3/4 washed gravel, sand and compost, mineral and carbon supplemented top soil. This will create ideal well drained conditions for your trees.
+
A visual representation of how the completed project would look:
SIDE VIEW (Cross-section):
Original slope
/
Completed /
Benches /
___2%___/
___2%___/ Each bench 7' wide
___2%___/ with 2% back slope
___2%___/
___2%___/ Each trench centered
[RETENTION BASIN] with two pipes
DETAIL OF ONE BENCH:
Back hill side Front edge
\ 7 feet wide /
\________________/
\_____T______/ ← 2% slope back
│
│
O = Drain pipe
O = Irrigation pipe
TOP VIEW (Looking down):
Original slope
│
______|______ ← Bench surface
______T______ ← Trench location
______|______
______T______
______|______
______T______
│
[RETENTION]
[BASIN]
[..]
I will put it in points and will make a proper plan of it: Here's the explanation of the dozer-based terracing technique in points:
1. Equipment Specification:
- Use a dozer with 7-foot wide 6-way blade
- Blade width determines bench separation distance
2. Bench Creation:
- Grade laterally across slope
- Each bench should be one blade width apart
- Create balanced cut and fill for each bench
- No soil needs to be removed or brought in
3. Bench Grade Specifications:
- 2% negative slope back toward hillside
- Less than 2% grade along the bench length
- Designed for controlled sheet flow
- Water pools against hill for absorption
4. Trench System:
- Create trench down center of each bench
- Install two pipes in each trench:
* Perforated drain pipe
* Irrigation pipe
5. Trench Fill Layers (bottom to top):
- 3/4" washed gravel base
- Sand layer
- Compost layer
- Enhanced topsoil with:
* Mineral supplements
* Carbon supplements
6. Benefits:
- Creates well-drained conditions
- Supports optimal tree growth
- Manages water effectively
- Provides built-in irrigation system
- Balances water retention and drainage
[..]
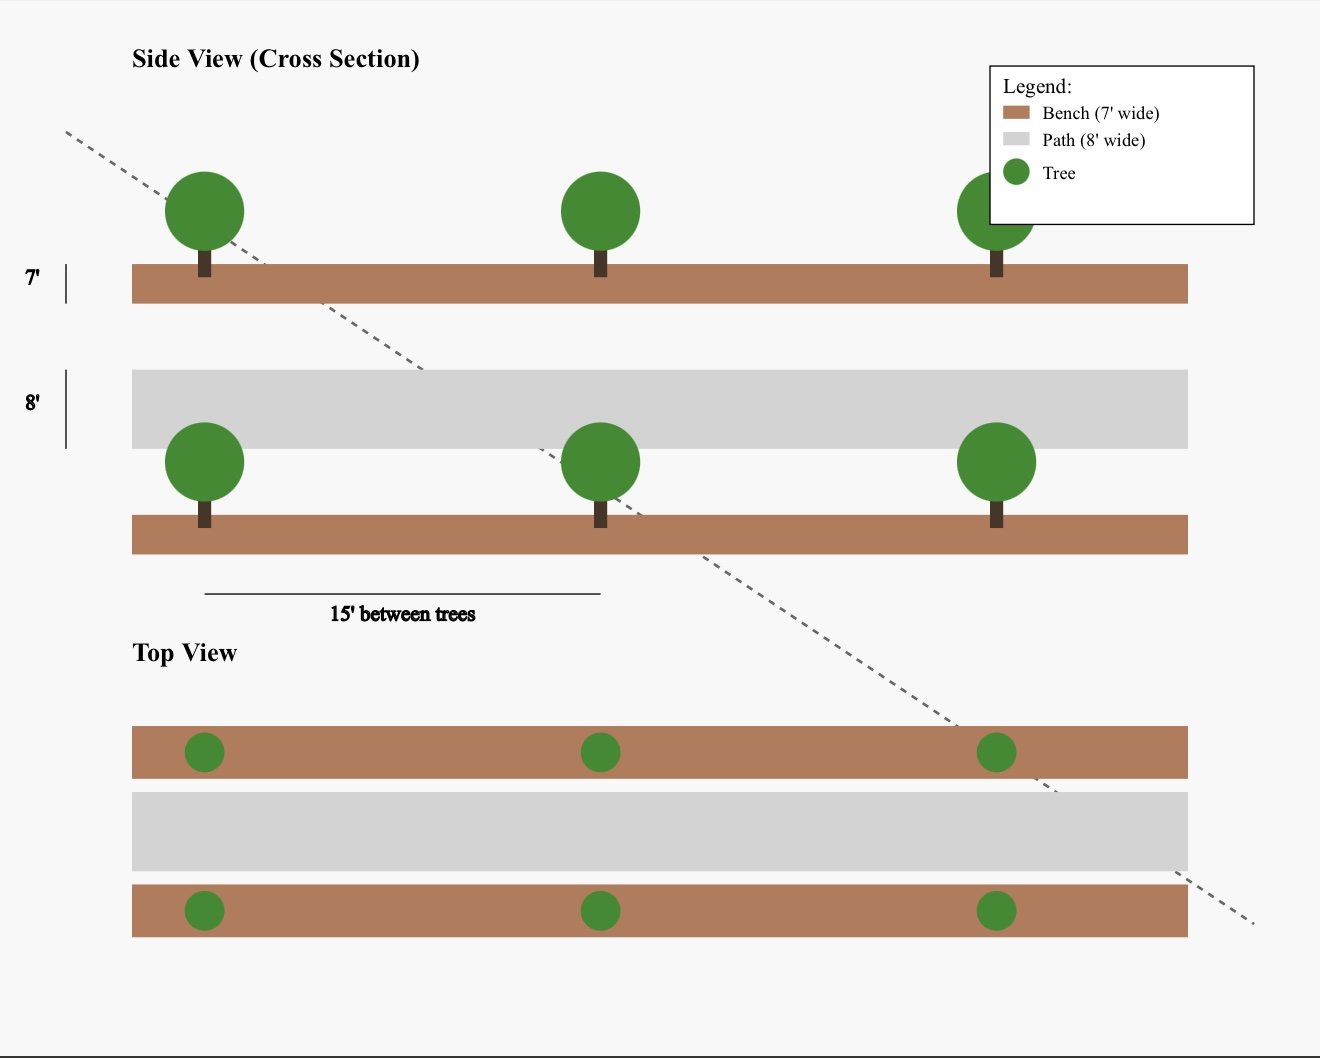
Let’s recalculate with 15' between trees and keeping 8' paths:
Width pattern :
7' bench (trees)
8' path (equipment)
7' bench (trees)
8' path (equipment)
= 30' for complete set
Length calculation changes:
Length: ~500 feet
Tree spacing: 15 feet
Trees per row: 500' ÷ 15' = ~33 trees per row
Available width: ~200 feet
Number of sets: 200' ÷ 30' = 6 complete sets
Number of tree rows: 6 sets × 2 = 12 rows
Total possible trees: 12 rows × 33 trees = ~396 trees
Pattern now looks like:
One row:
T----15'----T----15'----T
(T = Tree)
Cross section:
B = 7' Bench
P = 8' Path
B-P-B-P-B-P-B-P-B-P-B-P
|<-- 30' -->| One set
[..]
A Comprehensive view showing all these aspects:
Key aspects of this layout:
1. Tree Spacing:
15' between trees allows for:
- Mature canopy development
- Good air circulation
- Easy harvesting access
- Disease prevention
2. Equipment Access:
8' wide paths provide:
- Tractor access
- Sprayer movement
- Harvest equipment
- Maintenance vehicles
3. Curved Adjustments:
On curves:
- Trees follow contour lines
- Spacing adjusted slightly
- Wider on outside curve
- Tighter on inside curve
4. Row Configuration:
B = 7' Bench with trees
P = 8' Path
One complete set:
B-P-B-P = 30' total
For your ~200' width:
Can fit 6 complete sets
= 12 rows of trees
5. Total Trees:
Per row (straight section): ~33 trees
× 12 rows = ~396 trees total
Minus curve adjustments: ~375-380 trees final count
[..]
The trees should be planted ON the benches! Let me clarify this layout:
SIDE VIEW
Original slope
\
\ Tree Tree Tree Tree
\_7'_/ \_7'_/ \_7'_/ (Benches)
8' 8' 8' (Paths)
DETAIL OF ONE SET:
Back hill
\
\ T T T T (Trees on bench)
\_7'_/ (Each tree 15' apart)
8' (Path)
\_7'_/ (Next bench)
8' (Path)
Each Tree Position:
- Trees are planted on the bench part
- Roots have full 7' bench width
- Back slope provides natural water catchment
- Irrigation pipe serves each tree row
- Paths BETWEEN benches for access
[..]
There are 43 pages/parts. You can also scroll down to the very bottom for a quick summation.
[..]
PART 1:
Think of it like creating a series of "giant stairs" on the hillside, but each "step" (terrace) has some special features:
Traditional terraces often look like this:
___________
|___________
|___________
But our method will create terraces that look more like this (side view):
_____\
_____\
_____\
Where:
- Each "step" slightly tilts back into the hill (that's the 2% grade we'll discuss)
- They're exactly 7 feet apart (one dozer blade width)
- They're not completely flat but have a slight tilt for water control
This is different from traditional terracing because:
1. We're using precise machinery measurements (the dozer blade)
2. We're incorporating drainage and irrigation systems
3. We're creating a specific tilt for water management.
[..]
PART 2:
Let's talk about creating these benches (terraces) with the dozer.
Think of it like spreading peanut butter on bread, but on a hillside:
1. The Process:
- The dozer drives across the slope (sideways on the hill, not up and down)
- As it moves, it:
* Cuts into the uphill side (like scooping)
* Pushes that soil forward and to the downhill side (like spreading)
* This creates a level-ish platform
2. "Balanced cut and fill" means:
- What you "cut" from the hill = What you "fill" on the outer edge
- Like if you took a scoop of ice cream and put it right next to where you scooped
- You're not adding or removing soil, just moving it a few feet
Visual line representation:
Before: After:
///// → /____/
///// /____/
Where:
- ///// = Original slope
- ____ = New flat area
- / = Cut or fill area
[..]
PART 3:
It's like creating a series of long tubs with slanted sides going down the hillside.
Let me draw it more clearly:
Hill \ back slope
\_____________/ <- Each "tub"
\ back slope
\_____________/
\ back slope
\_____________/
Where:
- The back slope (against the hill) is higher
- The base has a slight tilt backward (like a tub that would hold water)
- Each "tub" catches water and lets it soak in rather than run off
- They're connected like stair steps down the hill
Just like a bathtub:
1. Has a high back
2. Has sides to contain water
3. Has a slight slope for drainage (but in our case, we want it to slope BACK toward the hill)
[..]
PART 4:
Let me explain how it's similar and different from a swale:
Similar to a swale:
1. Both catch and hold water
2. Both follow the contour of the land
3. Both help with water management
Different from a swale:
1. Shape:
- Swale: More like a ditch or channel
___________
\./ \.___
- Our "tubs": More like a tilted platform with infrastructure
Hill
\___________/ <- has pipes & layers
\___________/
2. Infrastructure:
- Swale: Usually just earthworks
- Our "tubs": Include:
* Drainage pipes
* Irrigation pipes
* Specific soil layers
* More engineered structure
3. Purpose:
- Swale: Mainly water catchment and slow release
- Our "tubs": Built for:
* Tree planting
* Controlled drainage
* Active irrigation
* Precise water management
[..]
PART 5:
Let's understand this 2% grade (tilt) - imagine a slight tilt on your bathtub, but very specific and for two different directions:
1. Back Tilt (toward hill) - 2%:
Hill side
\ 2% tilt back
\___________/
↓
For every 100 inches horizontal
It drops 2 inches toward hill
- Like a very slight tilt on a table where if you put a marble, it would slowly roll back toward the hill
- Just enough for water to move back, but not so much that soil erodes
- 2% means for every 100 units of distance, it drops 2 units
2. Along Length - Less than 2%:
Looking from above:
_________________
↓
Very slight tilt for length
(less than 2% to ensure sheet flow)
- "Sheet flow" means water spreads out evenly like a sheet
- Not enough slope to create channels or gullies
- Prevents water from concentrating in one spot
[..]
PART 6:
Let's talk about the trench system - this is what goes into the middle of each "tub":
Side view of ONE "tub":
Hill side
\________________/
\______T_______/
↑
Trench here
Think of the trench like a canal down the middle of each tub, where we put two different pipes:
1. Drainage Pipe (Perforated):
- Like a pipe with tiny holes in it (think paper towel roll with holes)
- Collects excess water to prevent flooding
- Water can seep in through the holes
2. Irrigation Pipe:
- Like your garden hose but permanent
- Delivers water when needed
- Can connect to water source for controlled watering
Trench close-up:
_____T_____
│
[O] │ [O]
│ │ │
Drainage │ Irrigation
Pipe │ Pipe
[..]
PART 7:
Let's talk about filling the trench - it's like making a layered sandwich that helps with water management.
From bottom to top:
1. First Layer: 3/4" Washed Gravel
_____T_____
o o o o o <- Gravel (like small clean rocks)
[O] │ [O] (pipes surrounded by gravel)
o o o o o
- "Washed" means clean, no dirt
- Creates spaces for water to move
- Supports and protects the pipes
2. Next Layer: Sand
_____T_____
. . . . . <- Sand
o o o o o <- Gravel below
[O] │ [O]
- Filters water
- Fills smaller spaces
- Prevents soil from clogging gravel
3. Then: Compost
_____T_____
~ ~ ~ ~ ~ <- Compost
. . . . . <- Sand
o o o o o <- Gravel
- Rich organic matter
- Feeds soil life
- Holds moisture
[..]
PART 8:
The top layer is like a super-charged soil sandwich that helps your plants grow better. Here's what goes into it:
_____T_____
# # # # # <- Enhanced Topsoil (the final layer)
~ ~ ~ ~ ~ <- Compost below
. . . . . <- Sand
o o o o o <- Gravel
The Enhanced Topsoil has 3 main parts:
1. Regular Topsoil (the base)
- Like the soil in your garden, but better quality
2. Mineral Supplements (think of it like vitamins for soil):
- Could include:
* Rock dust (like crushed rocks)
* Lime (if soil needs it)
* Clay minerals
- Helps:
* Feed plants
* Hold nutrients
* Improve soil structure
3. Carbon Supplements:
- Could be:
* Biochar (like special charcoal)
* Well-aged wood chips
* Other organic materials
- Helps:
* Hold water
* Feed soil life
* Store nutrients
[..]
PART 9:
Okay, let's see how this whole system works together - imagine it's like creating the perfect home for your trees:
1. The Water Journey:
Rain falls
↓
Topsoil Layer (absorbs first)
↓
Compost Layer (holds some)
↓
Sand Layer (filters)
↓
Gravel Layer (with pipes)
2. How it Works:
- When it rains:
* The 2% tilt sends water back to hill
* Soil mix soaks it up like a sponge
* Excess water finds drainage pipe
* Root zone stays moist but not soggy
- During dry times:
* Irrigation pipe provides water
* Rich soil holds moisture
* Roots have easy path to grow
* Trees can access deep moisture
3. Benefits for Trees:
- Roots can:
* Spread easily through good soil
* Access water when needed
* Find nutrients easily
* Grow deep and strong
Think of it like a tree apartment with:
- Perfect drainage (no wet feet)
- Built-in water supply
- Rich food source
- Good air circulation
[..]
PART 10:
The last point is about the overall benefits of this whole system - let's break down why this design is so good:
1. Well-drained conditions:
Bad soil drains like this: Our system drains like this:
RAIN RAIN
↓ ↓
FLOOD! Spreads evenly
///////// \_____T_____/
(puddles) (no puddles)
2. Tree growth benefits:
- Roots don't get:
* Too wet (would rot)
* Too dry (would stress)
* Stuck (can spread easily)
- Like having a perfect tree home
3. Water management:
- No water wasted
- No erosion
- No drought stress
- Like having a water bank account:
* Saves water when plenty
* Uses it when needed
4. Built-in solutions:
- Waters itself (irrigation pipes)
- Drains itself (drainage pipes)
- Feeds itself (rich soil mix)
- Like having an automatic tree care system
[..]
PART 11:
REFER CONTOUR MAP 1
Let's break down the process step by step for this specific site:
1. Starting Point:
- You have contour lines every 5 feet (shown on map)
- The red lines show existing swale layout at 19'7 3/4" spacing
- There's an existing retention/detention basin at the bottom
- The area is marked as "FENCED PASTURE"
2. For the Dozer Work:
Current: After Dozer:
///// /_____/ <- 7' wide bench
///// → /_____/ <- 7' wide bench
///// /_____/ <- 7' wide bench
- Start from the top
- Work parallel to existing swale lines
- Each bench will be 7' wide (one dozer blade)
3. Key Features to Note:
- You have an advantage of:
* Existing retention basin at bottom
* Already marked contour lines
* Clear boundaries
* Existing water management
[..]
PART 12:
1. Starting Position:
START HERE
↓
/___/ First bench (7' wide)
/___/ Second bench
/___/ Third bench
⋮
↓
RETENTION BASIN
For our specific site:
- Start at the highest point of the fenced pasture
- Work parallel to those existing red lines (19'7 3/4" swales)
- Each new bench will be 7' wide instead of 19'7 3/4"
Think of it like this:
Before (your current swales): After (new benches):
19'7 3/4" 7'
______ _____
______ _____
______ _____
_____
[..]
PART 13:
The benches will be BETWEEN the red lines. Here's why:
Current red swales: New benches (between swales):
\___19'7"___/ \___19'7"___/
\_7'_/
\_7'_/
\___19'7"___/ \_7'_/
\___19'7"___/
In your fenced pasture area:
- Current: Swales are 19'7" apart (red lines)
- New: We'll fit about 2-3 benches between each existing swale
- Each bench = 7' (dozer blade width)
Think of it like filling in the spaces between your current swales with smaller "steps" (benches).
[..]
PART 14:
1. Spacing Calculation:
Current gap between swales: 19'7¾"
Bench width needed: 7'
19'7¾" ÷ 7' = roughly 2.8 benches
This means we can fit 2 full benches safely between each existing swale
2. New Pattern:
Existing swale (red line)
\_______________________/
\_7'_/ Bench 1
\_7'_/ Bench 2
\_______________________/
Existing swale (red line)
3. Drainage Pattern:
Water flow:
Swale → \_________________/
Bench 1 → \_2%_slope_/
Bench 2 → \_2%_slope_/
Swale → \_________________/
↓
Retention Basin
[..]
PART 15:
The detailed cross-section between two existing swales:
Existing swale (red line) Higher elevation
\_____________________/ <-- 19'7¾" total width
\_7'_/ Bench 1 <-- 2% back slope
↓ (water collects here)
\_7'_/ Bench 2 <-- 2% back slope
↓ (water collects here)
\_____________________/
Existing swale (red line) Lower elevation
Side View of ONE bench:
Hill side 2% slope back Outer edge
\__________________/
\______T_________/
↑
Trench with pipes
Key measurements for each bench:
1. Width: 7' (dozer blade)
2. Drop: About 1.7" across the 7' (2% slope)
3. Trench position: Center of bench
4. Total drop between swales: Following existing grade
[..]
PART 16:
Let’s make this super clear:
BEFORE:
Red swale \_________________________________________/
Empty space here
(this is where you'll scoop)
Red swale \_________________________________________/
AFTER:
Red swale \_________________________________________/
\_7'_/ Scoop 1 with dozer blade
\_7'_/ Scoop 2 with dozer blade
Red swale \_________________________________________/
The Process:
1. Your dozer drives between the red lines
2. Makes one 7' wide level spot (bench)
3. Moves down slightly
4. Makes another 7' bench
5. These benches fit between your existing swales
Think of it like filling in the stairs between your existing red swale lines.
[..]
PART 17:
Let's go through each step:
1. Where Dozer Starts:
Start here
↓
Red swale \_________/ Top of slope
|<-7'->| First dozer scoop
Red swale \_________/
- Start at the highest end
- Line up dozer between red lines
- Keep dozer blade parallel to red lines
2. Turning at Ends:
Red swale \_________
\
First bench _______ \ Turn zone
Second bench ______ /
Red swale \_________/
- Lift blade slightly when turning
- Follow curve of existing swales
- Make wider turns to maintain bench integrity
3. Scoop Depth:
Side view of ONE scoop:
Original slope: ///////
↓
After scoop: /___2%__\
|<--7'-->|
Depth: Usually 1-2 feet at deepest point
[..]
PART 18:
Current Slope (25-30% steep):
\
\ Like this (steep)
\
\
After Benching (more level with small 2% back-slopes):
\____ Like stairs
\____ Each "step" is almost level
\____ (just 2% back-slope)
\____
We're turning the steep slope into a series of nearly-level "steps" where:
- Each step is 7' wide
- Almost flat (just 2% tilt back)
- Much less steep than original
- Holds water instead of letting it run down
The dozer is actually:
1. Cutting into the hill
2. Moving that soil forward
3. Creating level platforms
4. Dramatically reducing the overall slope
[..]
PART 19:
INSERT THREE CONTOUR MAPS
I can give you a practical step-by-step process using actual site. There is:
- 2.08 acres in the marked area
- Existing contours every 5 feet
- Red (proposed)swale lines at 19'7¾" spacing
- An existing retention basin at the bottom
Let's start from the beginning:
1. Site Preparation:
- Mark your starting point at the top of the fenced pasture
- Work parallel to those red lines
- Ensure dozer has clear access path
2. First Pass with Dozer:
Start here at top
↓
-------- Original slope
\_____/ First 7' bench cut
-------- Continue slope
- Cut into hill
- Push soil forward to create level spot
- Check 2% back slope with level
[..]
PART 20:
Let's break down the exact process for creating 7' benches directly:
STEP 1: Site Marking
Top of slope
↓ Mark every 7' parallel
____ 7' ____ to contour lines
____ 7' ____ (use stakes or flags)
____ 7' ____
↓
To retention basin
- Start at top of slope
- Mark first line following contour
- Use measuring tape/wheel for 7' intervals
- Place stakes/flags as guides
STEP 2: First Cut
Original slope: After first cut:
/////// /
|___2%___\ ← 7' wide
/////// /
- Start at top stake line
- Cut into hill at 7' width
- Keep 2% back slope
- Check level frequently
[..]
PART 21:
Let’s go through everything in detail:
1. MARKING PROCESS:
Top of slope
1. Place first stake following contour line
2. Measure 7' down slope
3. Place next stake
4. Use string line between stakes
First stake O
String line |
Next stake O
Tools needed:
- Stakes/flags
- Measuring wheel/tape
- String line
- Level tool
- Marking paint
2. CHECKING 2% GRADE:
7 foot bench width:
Back │<------- 7 feet ------->│ Front
│ │
│ Drop = 1.68 inches │
│(2% of 7 feet) │
└────────────────────────┘
Tools for grade:
- 8' level
- Tape measure
- Grade stakes
- For 2% over 7': needs 1.68" drop
3. CUTTING PROCESS:
Step 1: /////// Original slope
Step 2: /
|___2%___\ First bench
///////
Step 3: /
|___2%___\
|___2%___\ Second bench
///////
4. SOIL MANAGEMENT:
- Cut from uphill
- Fill downhill edge
- Compact as you go
- Maintain 2% back slope
5. QUALITY CHECKS:
- Check level every 10'
- Verify 2% slope
- Ensure proper drainage
- Test water flow
[..]
PART 22:
Let's break down each aspect for the specific 2.08 acre site:
1. SPECIFIC MEASUREMENTS:
Your slope length ≈ 300-350 feet
With 7' benches:
350' ÷ 7' = ~50 benches possible
Each bench needs:
- 7' width
- 1.68" drop for 2% grade
- About 1-2' cut depth at back
2. COMPACTION PROCESS:
Each bench: Back │<--- 7' --->│ Front
Before: ///////
Cut: /____/ (loose soil)
Compact: /___/ (firm soil)
Use dozer tracks to compact
- Run dozer over each bench 2-3 times
- Compact when soil is slightly moist
- Check firmness as you go
3. DRAINAGE PATTERN:
Rain falls
↓
Top bench \_____/
↓ 2%
Next bench \_____/
↓ 2%
Each bench catches & holds water
4. HANDLING CURVES ( site has several):
Straight: |________|
Curve: |____/
|___/ Maintain 7' width
|__/ following contour
[..]
PART 23:
Let me break this down comprehensively for the 2.08 acre site:
1. SOIL MOVEMENT CALCULATIONS:
For each 7' bench:
Width: 7 feet
Length: ~200 feet (from your map)
Cut depth: ~2 feet at back, tapering to fill
Volume per bench:
- Cut: ~7' × 2' × 200' = 2,800 cubic feet
- This soil becomes the fill for outer edge
2. SPECIFIC STARTING POINTS:
Your Site Layout:
Top ←Start here
\___________________
\ \
\ Retention \
\ Basin \
\_______________/
- Begin at highest point
- Work from top to bottom
- Stay parallel to contours
3. MACHINE OPERATION:
Dozer Position & Movement:
→→→→→ First pass
←←←←← Return pass
↓ Drop down 7'
→→→→→ Next pass
Steps:
a. Blade angle: 15° forward
b. Cut depth: Start 2' deep
c. Speed: 2-3 mph steady
d. Overlap passes by 6"
4. RETENTION BASIN CONNECTION:
Benches: Last bench
\_____/ must connect to
\_____/ existing basin
\_____/ →→ for overflow
Basin: [___________]
[..]
PART 24:
1. DAILY WORK PLANNING:
Day 1: Site Prep
- Mark boundaries
- Set grade stakes
- Check soil moisture
- Stage equipment
Day 2-3: Top Section
Morning: |_____| First 5-6 benches
Afternoon:|_____| Next 5-6 benches
Check grade every 2 hours
Day 4-5: Middle Section
Similar pattern, more careful around curves
Day 6-7: Bottom Section
Extra attention connecting to retention basin
2. SOIL TESTING:
Before Starting:
- Moisture content (15-25% ideal)
- Compaction test
- Soil type check
During Work:
AM__|____|____|____ Check moisture
PM__|____|____|____ Check compaction
3. EROSION CONTROL:
Temporary Measures:
Top → ~~~~ Straw wattles
Middle → ~~~~ during construction
Bottom → ### Silt fence
[Basin]
4. EQUIPMENT SPECS:
Dozer Requirements:
- 6-way blade (7' wide)
- GPS grade control if available
- Low ground pressure tracks
- Smooth bucket for final grade
Support Equipment:
- Water truck
- Compactor
- Grade checking tools
[..]
PART 25:
COMPLETED STEPS:
1. Site Marking
- Stake placement
- 7' measurements
- String lines
- Level checking
2. First Cut
- One 7' bench
- 2% back slope
- Initial leveling
NEXT STEPS TO BE EXPLAINED:
3. Completing First Bench
4. Moving to Second Bench
5. Connecting Benches
6. Edge Treatment
7. Drainage Installation
8. Final Grading
9. Basin Connection
[..]
PART 26:
OK, let's focus on Step 3 - Completing First Bench in detail:
After your first cut, you have this:
Original slope: ///////
First cut: /
|___rough cut___\
STEP 3: COMPLETING FIRST BENCH
A. Fine Grading:
1. Start with rough cut
/
|___rough___\
2. Smooth blade passes
/
|____2%____/
3. Final grade with 2% slope
/
|____2%____/ ← Check level every 20'
B. Critical Checks:
1. Width: Maintain exact 7' throughout
2. Slope: 2% back slope (1.68" drop over 7')
3. Level: Use long level every 20' of length
4. Compaction: Dozer tracks over entire surface
C. Common Issues to Watch:
BAD: GOOD:
/ /
|___/\_____/ |____2%____/
(uneven) (consistent)
[..]
PART 27:
Let's address common problems and testing for the first bench:
1. COMMON PROBLEMS & FIXES:
A. Wavy Surface:
Problem: /
|___/\_/\_/
Fix: /
|____2%____/
Method:
- Multiple light passes with blade
- Keep consistent speed
- Blade at slight angle
B. Inconsistent Width:
Problem: /
|__Wide__/
|_Narrow_/
Fix: Use stakes as guides
| | | | | |
7' 7' 7' 7' 7' 7'
Mark every 20' to maintain width
C. Wrong Back Slope:
Problem: Too Steep Too Flat
/ /
|___\ |______/
Fix: / /
|__2%_/ |__2%_/
Use level & grade stakes frequently
2. TESTING READINESS:
A. The "Ball Test":
- Roll a ball on bench
- Should roll slowly back to hill
- If too fast = too steep
- If stops = too flat
B. Water Test:
Spray water: Should sheet evenly
/_____/ No channels forming
↓↓↓↓↓ No pooling spots
C. Completion Checklist:
- [ ] Consistent 7' width
- [ ] 2% back slope everywhere
- [ ] Smooth, compacted surface
- [ ] No loose soil
- [ ] Water drains evenly
- [ ] Edge properly supported
Ready for Step 4 when:
1. All checks pass
2. No standing water
3. Soil is firmly compacted
4. Edge is stable
[..]
PART 28:
Let's move to Step 4 - Creating Second Bench:
1. POSITIONING FOR SECOND BENCH:
First bench completed:
/
|____2%____/ ← First bench (done)
/////// ← Start second bench here
Measure down exactly 7' from outer edge
|____2%____/
|<--7'-->|
Mark new cutting line
2. CUTTING PROCESS:
Stage 1: |____2%____/ (First bench)
///////
Stage 2: |____2%____/
/
|__rough__/ (Initial cut)
Stage 3: |____2%____/
/
|____2%____/ (Finished)
3. CRITICAL CONNECTION POINT
Side view of connection:
|____2%____/
↑
|____2%____/
Junction must be smooth
No lips or gaps
[..]
PART 29:
Here's the detailed breakdown for benches connection:
1. MAINTAINING PROPER SPACING:
TOP VIEW SIDE VIEW
Stake Layout: Bench Relationship:
O First bench |____2%____/
| 7' |<--7'-->|
O Second bench |____2%____/
| 7'
O Third bench
Check points:
- Use string lines between stakes
- Measure diagonally to ensure parallel
- Check both ends and middle
2. HANDLING SOIL BETWEEN BENCHES:
Before: After:
|____2%____/ |____2%____/
/////// \ | Cut
/////// \ |____2%____/
(Cut soil moves (Balanced cut
to fill area) and fill)
Process:
- Cut from upper area
- Push forward to create fill
- Compact as you go
- Never leave loose soil
3. CONNECTION POINTS:
GOOD Junction: BAD Junction:
|____2%____/ |____2%____/
↓smooth ↓gap
|____2%____/ |___/\_____/
Critical Areas:
|____2%____/
A B A = Back junction
|____2%____/ B = Front junction
Both must be smooth
Check list for connections:
- No gaps
- No humps
- Water flows smoothly
- No soil buildup
- Proper compaction at joints
Next Step 5: Drainage Integration?
[..]
PART 30:
Step 5 - Drainage Integration:
1. TRENCH LAYOUT IN EACH BENCH:
Single Bench Top View:
|<------ 7 feet ------>|
|______________________|
T (Trench here)
│
Center trench location
Side View of Bench:
Back |<------ 7' ------>| Front
\__|______T__________/__
↑ ↑ ↑
│ │ │
18" deep │ Slight crown
Pipes here
2. PIPE INSTALLATION:
Trench Cross Section:
Ground___T___level
│ │ │
│ O │ O │ ← Two pipes
│PER│IRR│
└───┴───┘
Key:
PER = Perforated drain pipe
IRR = Irrigation pipe
3. CONNECTING BETWEEN BENCHES:
Multiple Bench Connection:
|____T____/ Upper bench
│
|____T____/ Middle bench
│
|____T____/ Lower bench
│
To retention basin
[..]
PART 31:
1. PIPE SPECIFICATIONS:
Drainage Pipe (PER):
- 4" perforated pipe
- Holes facing down
- Schedule 40 PVC
- Holes: 3/8" every 6"
O (pipe cross section)
↓ ↓ ↓ (holes down)
Irrigation Pipe (IRR):
- 2" solid pipe
- Schedule 40 PVC
- Pressure rated
- No perforations
O (solid pipe)
2. TRENCH SOIL LAYERING:
Ground level___T___
│ Topsoil │
│~Compost~│ Depths:
│.Sand...│ - Total: 18"
│oGravelo│ - Gravel: 6"
│O PER O│ - Sand: 4"
└───────┘ - Compost: 4"
- Topsoil: 4"
Key:
o = 3/4" washed gravel
. = Coarse sand
~ = Compost
= Enhanced topsoil
3. RETENTION BASIN CONNECTION:
Last Bench: |____T____/
│
Transition: │
↓
Basin inlet: [=======]
Retention
Basin
Connection Detail:
|____T____/
│ Use solid pipe
│ (no perforations)
└────→ in transition
Basin to basin
Next Step 6: Final Grading and Surface Preparation?
[..]
PART 32
Step 6 - Final Grading and Surface Preparation:
1. SURFACE FINISHING:
Each Bench Surface:
Back |<------ 7' ------>| Front
\_____|_____crown_______/___
Slight crown for drainage
Cross Section:
Very slight crown
\_____/‾‾‾‾‾‾‾\______/
1" higher at center
2. CRITICAL AREAS TO CHECK:
B = Back edge
C = Crown/Center (with trench)
F = Front edge
B____C____F Check these points
| │ | every 20' along
| T | entire bench
3. FINAL GRADE CHECKLIST:
For each bench:
|_____T_____/
1→2→3→4→5→6 Work left to right
Check Points:
1. Back slope (2%)
2. Surface crown
3. Trench cover
4. Compaction
5. Edge stability
6. Water flow
[..]
PART 33
1. COMPACTION TECHNIQUES:
Pattern: Coverage:
→→→→→→ ||||||||
←←←←←← ||||||||
↓ Each | = One
→→→→→→ track width
(Overlap 1')
Moisture Test:
Squeeze soil:
- Forms ball = Good
- Crumbles = Too dry
- Slick = Too wet
2. SOIL AMENDMENT PROCESS:
Layer Application:
Original → Amended
Surface Surface
| ~~~~~ Compost (1")
| ===== Minerals
| ----- Original soil
|
| Mix top 4-6"
Amendments per 100 sq ft:
- 2-3 cu ft compost
- 5 lbs minerals
- pH adjusters as needed
3. EROSION PROTECTION:
Immediate Protection:
|____T____/
s s s s s (Straw or mulch)
|____T____/
Edge Protection:
|____T____/
^^^^^ (Erosion blanket)
|____T____/
Temporary Measures:
Top → ~~~~ Straw wattles
Middle → ^^^^ Erosion mat
Bottom → #### Silt fence
Next Step 7: Planting Preparation and Irrigation Setup?
[..]
PART 34
Step 7 - Planting Preparation and Irrigation Setup:
1. IRRIGATION ZONES PER BENCH:
Single Bench Layout:
|<------ 7' ------>|
|___s___T___s______|
│ │ │
S M S S = Sprinkler/dripper
M = Main line
Top View of Multiple Benches:
|___s___T___s_____|
│ │ │
|___s___T___s_____| → Control valve
│ │ │ location
|___s___T___s_____|
2. PLANTING ZONES:
Bench Cross Section:
Back |<---- 7' ---->| Front
\_____|__T__|______/__
A │ B │ C
Zones:
A = Deeper rooted plants
B = Above trench (shallow roots)
C = Front edge plants
3. SOIL PREPARATION FOR PLANTING:
Per Planting Hole:
Ground___level___
│ ↓↓↓↓ │ ↓ = Water test holes
│ Mix Zone │
│ O │ O = Planting hole
└──────────┘
[..]
PART 35:
1. PLANT SPACING:
Bench Top View:
|<------ 7' ------>|
Back T (Trench) Front
L M S
│ │ │
6' 4' 3' (spacing between plants)
Plant Types by Zone:
L = Large (trees/large shrubs)
M = Medium (shrubs/perennials)
S = Small (ground covers)
Layout Example:
L L L L (Back)
M M M M M (Middle)
S S S S S S (Front)
2. IRRIGATION COMPONENTS:
Main Line Setup:
|____T____/
│v│ v = Valve
│f│ f = Filter
│p│ p = Pressure regulator
Distribution:
Main
│
┌──┼──┐
D D D D = Drip line
│ │ │
e e e e = Emitter
3. WATER MANAGEMENT:
Control Zones:
Zone 1 (Top benches)
|____T____/ ←Timer A
|____T____/
Zone 2 (Middle)
|____T____/ ←Timer B
|____T____/
Zone 3 (Bottom)
|____T____/ ←Timer C
Flow Rates:
- Back zone: 2 GPH
- Middle: 1 GPH
- Front: 0.5 GPH
Next Step 8: System Testing and Initial Operation?
[..]
PART 36:
1. WATER SYSTEM TESTING:
Test Sequence:
A. Pressure Test
Main → |____T____/
P↑ ↑ ↑ P = Pressure gauge
Check 3 points per bench
B. Flow Test
|____T____/
1→2→3→4 Test each emitter
↓ ↓ ↓ ↓ Catch cups to measure
2. DRAINAGE TEST:
Pour Test Points:
|____T____/
P P P P P = Pour water
↓ ↓
C C C C C = Check drainage
|____T____/ time (should be <2hrs)
Watch For:
- Pooling spots
- Slow drainage
- Uneven flow
3. BENCH STABILITY TEST:
After Water:
|____T____/
W W W W W = Weight test points
Check:
- No settling
- No erosion
- No slumping
[..]
PART 37:
1. TROUBLESHOOTING STEPS:
A. Water Issues:
Problem: Solution:
No flow → Check valves/clogs
───────── ────────────────
Uneven flow → Clean filters
───────── ────────────────
Pooling → Regrade surface
O
↓
|__O_T____/ O = Problem spot
B. Soil/Stability Issues:
Problem: Fix:
Slumping: Add support
|___\____/ → |____/___/
+ edge support
Erosion: Add protection
|__/\____/ → |___~___/
~ = erosion mat
2. ADJUSTMENT PROCEDURES:
Irrigation Adjustments:
|____T____/
↕ ↕ ↕ Arrows show
A B C adjustment points
A = Pressure
B = Flow rate
C = Timer settings
Settings by Season:
Spring: 2x/week
Summer: 3x/week
Fall: 1x/week
Winter: Monitor only
3. MAINTENANCE SCHEDULE:
Daily (First Month):
AM__|__|__|__ Visual checks
PM__|__|__|__ Flow checks
Weekly:
|____T____/
W F E W = Weed check
F = Flow check
E = Erosion check
Monthly:
- Clean filters
- Check valves
- Test drainage
- Inspect slopes
[..]
PART 38:
Step 9 - Final Inspection and Sign-off:
1. COMPLETE SYSTEM INSPECTION:
Check Each Bench:
|____T____/ Numbers = Inspection sequence
1 2 3
|____T____/
4 5 6 Document each point
|____T____/
7 8 9
Inspection Points:
1. Grade (2% back slope)
2. Bench width (7' consistent)
3. Soil compaction
4. Drainage function
5. Irrigation operation
6. Edge stability
7. Plant health
8. Erosion control
9. Connection points
2. DOCUMENTATION REQUIREMENTS:
For Each Section:
Zone A __|__|__|__ Photo points
Zone B __|__|__|__ Measurements
Zone C __|__|__|__ Test results
Record:
- Final grades
- Pipe locations
- Control points
- Test results
- Photos
3. FINAL DOCUMENT PACKAGE:
Include:
1. As-built drawings
|____T____/
Exact measurements
2. Operation Manual
- Irrigation schedules
- Maintenance tasks
- Emergency procedures
3. Contact List
- Contractors
- Suppliers
- Emergency numbers
[..]
PART 39:
Here's the detailed breakdown of these final aspects:
1. CHECK PROCEDURES:
Coverage Timeline:
Month 1-3: Full system check
|____T____/ Weekly inspections
Month 3-6: Bi-weekly checks
Month 6-12: Monthly checks
STRUCTURAL SYSTEM
- Bench stability - Pipe integrity
- Grade maintain - Valve function
- Soil compaction - Flow rates
- Edge support - Drainage
2. ONGOING MAINTENANCE:
Regular Tasks:
DAILY: WEEKLY:
- Visual checks - System flush
- Flow monitor - Pressure check
- Erosion check
MONTHLY: SEASONAL:
|____T____/ Spring: Full check
M F E D Summer: Flow adjust
Fall: Winterize
M = Measure grade Winter: Storm prep
F = Flush system
E = Edge repair
D = Drain clean
3. MONITORING PROTOCOLS:
Key Points to Monitor:
Grade Check:
|____T____/
1 2 3 4 Fixed measure points
Flow Rates:
GPM Expected: Compare to:
Zone 1: __ Actual: __
Zone 2: __ Actual: __
Zone 3: __ Actual: __
Documentation:
Date__|__|__|__ Readings
Time__|__|__|__ Photos
Note__|__|__|__ Actions
[..]
PART 40:
Complete project summary for the 2.08 acre site:
PROJECT OVERVIEW:
Start: Top of slope
↓
Phase 1: Initial Layout
↓
Phase 2: Bench Construction
↓
Phase 3: Systems Installation
↓
End: Retention Basin
SEQUENCE BREAKDOWN:
1. SITE PREPARATION:
Original Slope After Marking
/////// ///////
/////// → /_7'_/ ← Stakes
/////// /_7'_/ ← Measures
2. BENCH CREATION:
Cut & Fill Process:
First: /_____/
Then: /_____/
/_____/
Each bench:
- 7' wide
- 2% back slope
- Compacted
3. INFRASTRUCTURE:
Per Bench:
|____T____/
│
Two pipes:
D = Drainage
I = Irrigation
4. COMPLETION:
Final System:
|____T____/ Multiple
|____T____/ connected
|____T____/ benches
[BASIN] with full
water management
[..]
PART 41:
Break down of all these final planning aspects:
1. TIMELINE ESTIMATION:
Week 1: Site Prep & Initial Cuts
|____M__|__T__|__W__|__Th__|__F__|
Mark Cut Cut Cut Check
Week 2-3: Bench Construction
|____T____/ Bench 1-10
|____T____/ Bench 11-20
|____T____/ Bench 21-30
(≈ 6-8 benches per day)
Week 4: Infrastructure
┌── Pipe Installation
├── Irrigation Setup
└── Drainage Connection
Week 5: Final Grade & Testing
2. RESOURCE REQUIREMENTS:
Equipment Needed: Duration:
╔════════════════╗ ╔════════════╗
║ Dozer ║──────║ 3 weeks ║
║ Compactor ║──────║ 2 weeks ║
║ Water Truck ║──────║ 3 weeks ║
║ Excavator ║──────║ 1 week ║
╚════════════════╝ ╚════════════╝
Materials Per Bench:
- Pipe: 200' × 2 types
- Gravel: 3-4 cubic yards
- Topsoil: 2-3 cubic yards
- Erosion control: 200 linear feet
3. COST CONSIDERATIONS:
Major Cost Centers:
Equipment: 40% |████████████
Materials: 30% |█████████
Labor: 20% |██████
Testing: 10% |███
Cost Saving Opportunities:
- Bulk material purchase
- Efficient equipment scheduling
- Proper soil reuse
- Phase work with weather
4. FUTURE EXPANSION:
Possible Additions:
|____T____/ → Add more benches
│
├── → Extended irrigation
│
└── → Additional plantings
Expansion Areas:
A: Upper slope
B: Side areas
C: Connection zones
Planning for Growth:
- Oversized main lines
- Extra valve capacity
- Junction points
- Future access paths
[..]
PART 42:
1. DETAILED TIMELINE:
PHASE 1 (Week 1):
╔═══════════════════════════╗
║ Day 1-2: Site Prep ║
║ - Survey & marking ║
║ - Soil testing ║
║ - Equipment staging ║
╚═══════════════════════════╝
PHASE 2 (Weeks 2-3):
For your slope length (~300'):
Day 1-5: Upper third
|____T____/ × 15 benches
Day 6-10: Middle third
|____T____/ × 15 benches
Day 11-15: Lower third
|____T____/ × 15 benches
2. SPECIFIC NUMBERS:
Materials Needed:
Per Bench (7' × ~200'):
- Drainage pipe: 200'
- Irrigation pipe: 200'
- Gravel: 3.5 cu.yd
- Sand: 2 cu.yd
- Topsoil: 2.5 cu.yd
Total for 45 Benches:
- Pipe: 18,000' total
- Gravel: 158 cu.yd
- Sand: 90 cu.yd
- Topsoil: 113 cu.yd
3. COST BREAKDOWN:
Equipment (40%):
Dozer: $2,800/week × 3
Compactor: $1,200/week × 2
Water truck: $1,500/week × 3
Excavator: $2,000/week × 1
Materials (30%):
Pipe: $4-5/ft
Gravel: $45-55/cu.yd
Sand: $35-45/cu.yd
Topsoil: $30-40/cu.yd
Labor (20%):
Operator: $75-85/hr
Laborers: $45-55/hr
Foreman: $85-95/hr
4. MAINTENANCE COSTS:
Monthly:
Inspection: $400-500
Repairs: $200-300
System check: $300-400
Yearly:
Major service: $2,000-3,000
Replacement fund: $1,500/yr
Emergency fund: $2,000/yr
[..]
PART 43:
Let me break down all these aspects for the 2.08 acre orchard project:
1. PHASING OPTIONS:
PHASE A: TOP SECTION
Week 1:
Mon-Wed: Site prep
Thu-Fri: First 5 benches
|____T____/ ← Start here
|____T____/ Days 1-3
|____T____/
|____T____/ Days 4-5
|____T____/
PHASE B: MIDDLE SECTION
Week 2:
|____T____/ Days 1-2
|____T____/ Pipe install
|____T____/ Days 3-5
│ Infrastructure
↓
PHASE C: BOTTOM SECTION
Week 3:
|____T____/ Basin
|____T____/ connection
[BASIN] & testing
2. EQUIPMENT SCHEDULING:
Equipment Timeline:
Week 1 Week 2 Week 3 Week 4 Week 5
│ │ │ │ │
Dozer ════════════════════════
Compactor ═══════════════
Water Truck ═══════════════════════
Excavator ═════
Pipe Tools ═════════
3. MATERIAL DELIVERY:
Delivery Schedule:
Day 1: Initial materials
├── Stakes/marking supplies
├── Erosion control
└── Basic tools
Week 1-2: Heavy materials
├── Gravel (50%)
├── Pipe (all)
└── Sand (50%)
Week 2-3: Finishing materials
├── Remaining gravel
├── Remaining sand
└── Topsoil
4. CREW REQUIREMENTS:
Core Team:
┌─ Foreman (1)
├─ Dozer operator (1)
├─ Excavator operator (1)
└─ Laborers (3-4)
Daily Crew Schedule:
7:00 AM: Safety meeting
7:15 AM: Equipment checks
7:30 AM: Work begins
│ Team A: Bench construction
│ Team B: Pipe installation
└ Team C: Finish work
4:00 PM: Daily review
/QUICK SUMMARY 👇🏼
The trees should be planted ON the benches! Let me clarify this layout:
SIDE VIEW
Original slope
\
\ Tree Tree Tree Tree
\_7'_/ \_7'_/ \_7'_/ (Benches)
8' 8' 8' (Paths)
DETAIL OF ONE SET:
Back hill
\
\ T T T T (Trees on bench)
\_7'_/ (Each tree 15' apart)
8' (Path)
\_7'_/ (Next bench)
8' (Path)
Each Tree Position:
- Trees are planted on the bench part
- Roots have full 7' bench width
- Back slope provides natural water catchment
- Irrigation pipe serves each tree row
- Paths BETWEEN benches for access
[..]
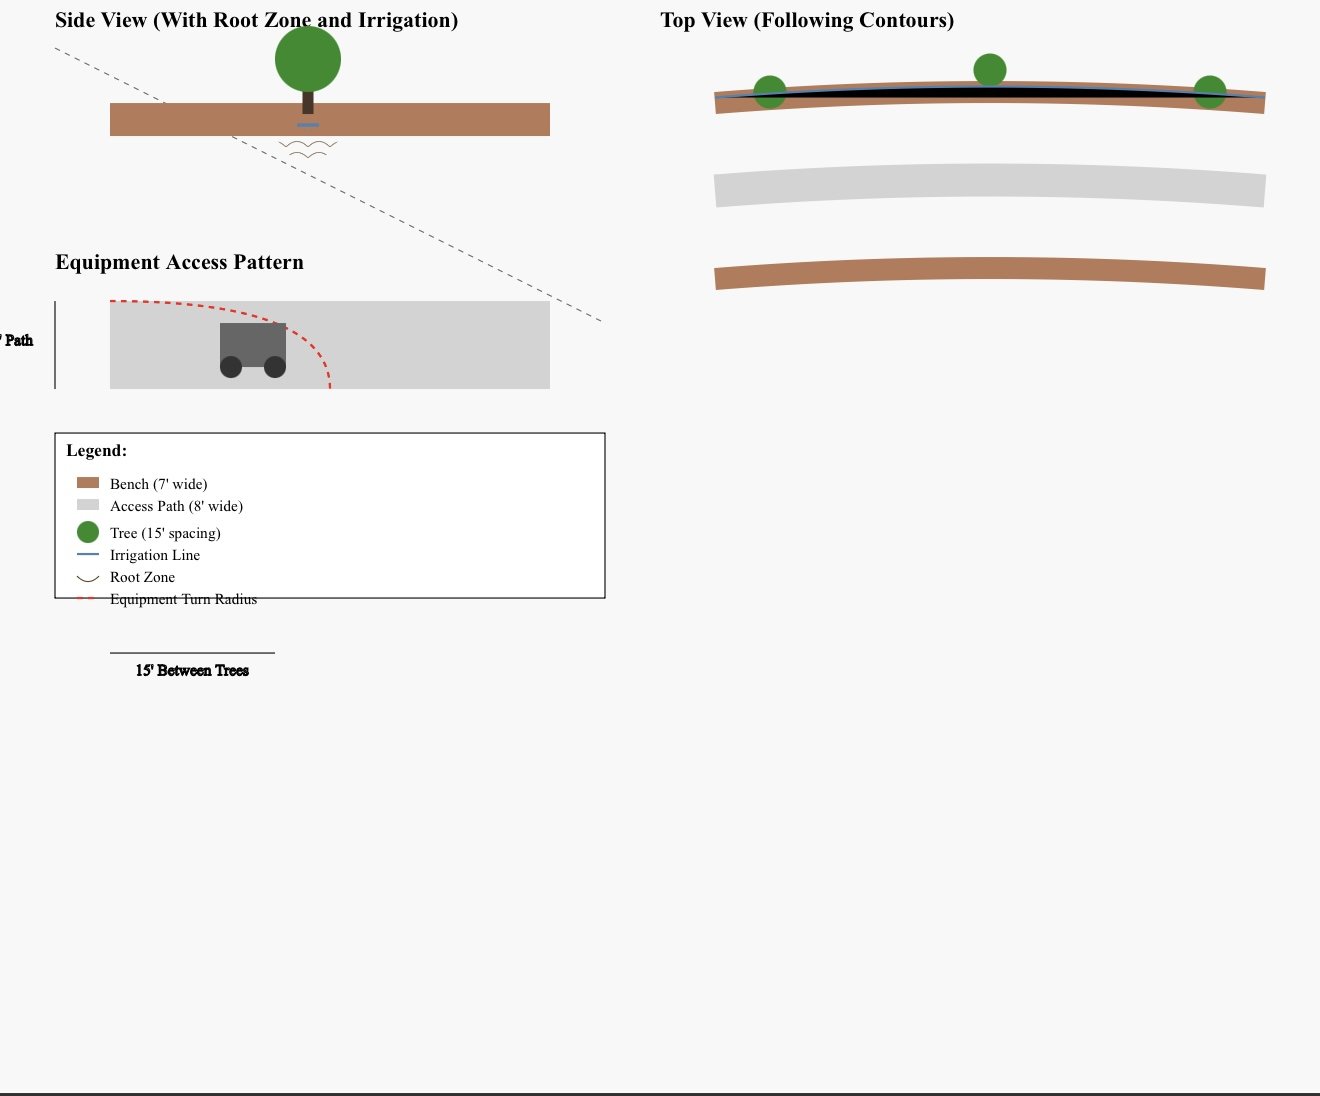
This comprehensive diagram shows:
1. Root Zone Development:
- Roots spread within bench width
- Deep penetration possible
- Water retention area
2. Irrigation System:
- Main line along bench
- Drip emitters at each tree
- Water distribution pattern
3. Equipment Access:
- 8' wide paths allow for:
* Tractors
* Sprayers
* Harvest equipment
- Turning radius shown
- Safe operation space
4. Contour Following:
- Trees follow natural contours
- Proper water management
- Erosion control
- Optimal land use
[..]
1. INSTALLATION SEQUENCE:
Step 1: Bench Creation
- Create 7' benches
- Ensure 2% back slope
- Compact properly
Step 2: Irrigation
- Install main lines
- Place emitters
- Test system
Step 3: Planting
- Mark 15' spacing
- Plant trees
- Initial watering
2. SEASONAL MAINTENANCE:
Spring:
- Pruning access
- Spraying equipment
- Soil amendments
Summer:
- Irrigation checks
- Pest monitoring
- Fruit thinning
Fall:
- Harvest equipment
- Bin placement
- Clean-up
Winter:
- Pruning access
- Soil work
- System maintenance
3. SITE SPECIFIC MEASUREMENTS:
Total Area: 2.08 acres
Length: ~500 feet
Width: ~200 feet
Layout:
- 12 rows of trees
- ~33 trees per row
- 8' equipment paths
- 7' benches
[..]
/FIN